Monday, March 30, 2009

What's Growing in the Garden

It's been a wet and rainy kind of day but I was prepared for the rain. When soaking rain is expected, I try to get as much in the ground as possible. Before today's rain, I planted a bed of spinach and another bed of radishes, arugula and mesclun.I cover the newly seeded beds with row covers to help germination and to keep garden critters out. Then I sit back and let rain do its thing.

Soaking up the cool, spring rain are...
Garlic planted last fall

Chives - a perennial that keeps coming back year after year.
A must for every kitchen garden.


Tête-à-tête daffodils - only 6" tall but the first to bloom.

Thursday, March 26, 2009

Spring Roll Lettuce Wrap

Spring roll lettuce wrap for two

When I make spring rolls I will usually double the recipe and stash them away in the freezer. Later in the season when I'm lost in the garden, these spring rolls are a god send.

When the garden is overflowing with salad greens and herbs, is the time to do the Wrap. Decoratively arrange a large platter of your favorite salad vegetables. Mine usually includes some or all of these:

Leaf lettuce
Sprigs of cilantro
Mint leaves
Bean sprouts
Cucumbers, sliced into thin half moons
Thin slices of raw onion
Cherry tomatoes, cut in half or quarters
Cooked rice noodles
Cooked Spring rolls, cut in half or bite size pieces, with kitchen scissors
Spicy Fish Sauce

At the table take a leaf of lettuce and fill it with a couple of cilantro leaves, one or two mint leaves, five or six bean sprouts, cucumber and onion slices, a piece of tomato, a few strands of noodles and a piece of spring roll. The idea is to add a little of everything but keep the bundle small enough to eat in one huge bite.

Wrap lettuce tightly around the whole bundle.

Drizzle with a generous amount of fish sauce.

Lean over your plate as you take a bite for this is not an elegant meal...it'll be messy...but dig in, eat with your fingers, play with your food.

Kitchen tips:
- Bake frozen spring rolls in a preheated 450 F oven for 30 minutes, turning once, until brown and crunchy.
- If you don't happen to have spring rolls lying around, you can wrap with pieces of cooked fish, chicken or beef.
- Spicy fish sauce, in a jar, will keep almost indefinitely in the refrigerator. It can be whatever you need it to be, a condiment, a salad dressing or a dipping sauce.

Saturday, March 14, 2009

Zucchini Bread for Knitting Foodies

Spring is definitely in the air...


and while I wait for the last snow to melt, I'm on a mission to use up everything I put up last summer and fall. We have been eating from the freezer all winter long and now it's looking quite bare. What I do still have is a few bags of shredded zucchini. Frozen in three cup portions, the exact amount called for in the zucchini bread recipe I've been wanting to try. This was originally a recipe for banana bread and a favorite of Christine's, a fellow knitter. Christine would often show up for our weekly knitting with her moist and not too sweet banana bread, which she serves with whipped cream cheese.

This week, I made my zucchini version for the knitters. Usually we all bring food to share but don't coordinate our efforts so every week is a surprise. Sometimes we all show up with crackers and cheese, sometimes we end up with lots of desserts. Last Tuesday, though, the stars and the moon were aligned and we had tremendous food....

Laura's Spinach, Beet and Goat Cheese Salad with Caramelized Walnuts

Lynne's Everything Quiche and Emily's Bacon and Mushroom

Christine's baguette with goat cheese and fig preserves

Ellen's red cabbage and carrot coleslaw

My Zucchini Bread

Sue's Lazy Daisy cake and a parade of other goodies...

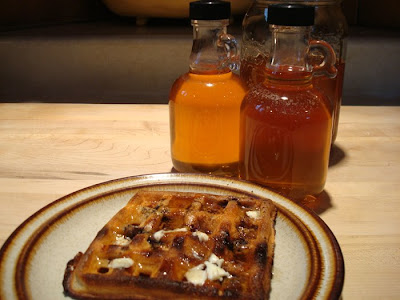
...but Karl prefers my homemade waffles with new 2009 vintage maple syrup

Among all that fancy food, my zucchini bread may seem quite ordinary, but don't be fooled, it's yummy, gorgeous and versatile. It's just right with afternoon tea, excellent for dessert and whether its my zucchini bread or Christine's banana version, we all pounce on it whenever it makes an appearance on knitting night. And best of all, it's so easy to make and handy to have around.

One Bowl Zucchini Bread
2 cups flour (I use King Arthur Flour's unbleached all purpose flour)
1 cup brown sugar
2 tsp baking soda
1 tsp cinnamon
1/4 tsp salt
1/2 cup oil
4 eggs
3 cups shredded zucchini
1/2 cup chopped walnut
2 tsp vanilla

Preheat oven to 350 F. Oil two loaf pans. Combine the dry ingredients in a bowl. Mix well with your fingers breaking up the lumps of brown sugar. With a wooden spoon, blend in the remaining ingredients in the order given. Beat the batter for 1 or 2 minutes. Bake about 45 minutes, until a tooth pick inserted in the center comes out clean. Cool before slicing. Makes two loaves.

Sunday, March 8, 2009

Snow Day Sourdough Waffles

Yesterday the temperature was in the mid forties and sunny. I sat outside in the warm sunshine, boiling sap, making syrup. Today snow...


So I made Sourdough Waffles to go with yesterday's fresh syrup. When my starter needs to be used and I don't have time to make bread, these waffles are my answer. Set it up the night before, stir in a few ingredients the next morning, and you have the best breakfast ever. They're crisp on the outside, light, fluffy and moist on the inside with a mild sourdough tang. Cook up the whole batch and throw any leftovers in the freezer. They're just as good toasted on a busy morning.

You just have to drag out the old waffle iron and give these a try. Once you've tasted them you'll want to make them over and over again.

Back in 2001 I ordered some sourdough starter from King Arthur Flour and it came with a recipe. I've tweaked and adjusted it over the years and it continues to be our family favorite, with or without the blueberries.

The night before sponge:
  • 1 cup All-Purpose Flour
  • 1 cup Whole Wheat Pastry flour
  • 2 tablespoons sugar
  • 2 cups buttermilk (I use Saco dry buttermilk, very convenient and keeps a long time in the fridge)
  • 1 cup sourdough starter

  • In a large mixing bowl, stir together the above ingredients. Cover and let rest at room temperature overnight.

    The next morning, while the waffle iron is pre-heating, make the batter
    • All of the overnight sponge
    • 2 large eggs
    • 1/4 cup vegetable oil
    • 3/4 teaspoon salt
    • 1 teaspoon baking soda
    • 1 cup fresh or frozen blueberries
    In a small bowl, beat together the eggs, and oil. Add to the overnight sponge, stir in the salt and baking soda. Add the blueberries. Pour batter onto your hot greased waffle iron. For the crispiest waffles, let most of the steam escape and the waffle will be very brown. Serve with butter and hot maple syrup. Serves 4.

    Tuesday, March 3, 2009

    How to Make Maple Syrup

    One and a half quarts of maple syrup made from eight 2 gallon buckets of sap, collected over a period of three days and twelve hours of boiling. Is it worth it, you might ask. That depends...to me there's something magical about sugaring. Maybe its the promise of the coming spring, or the miracle of the running sap when all the landscape is still frozen. The drip drip sound of sap hitting the buckets and the snail-pace of the boiling process ground me somehow, connecting me to the land and the trees. If you have one or two maple trees in your yard, give sugaring a try. Your reward will be golden, delicious maple syrup, nectar of the gods.

    Here are some simple steps for successful backyard sugaring.

    First identify your trees. This is usually easier in the fall, when you can look at the leaves and see their colors, mark the trees and wait for the sap to run. Here in my corner of southern New Hampshire, sap rises in late February when day time temperature is above freezing and night temperature below freezing.

    Use a 7/16" drill bit to drill 1 - 1 1/2" tap hole into a mature and healthy sugar maple. Locate the hole directly below the largest, healthiest limb, on the south, southeast or southwest side of the trunk.

    This is a standard metal sap spout you can buy at the local hardware store, if you live in sugaring country like I do, or you can mail order them from Bascom Maple Farms.


    Gently tap the spout into the drilled hole.
    Almost immediately the sap, clear as spring water, will spurt out and drip even before you can get the spout in.

    Hang the buckets to catch the drip.
    These are used aluminum sap buckets, available from Bascom's for a mere $3.50. They're available used because big syrup producers no longer use buckets, they use tubing to deliver sap to a big holding tank at the bottom 0f the hill.


    Collect and boil the sap.

    I start the boiling process outdoors, over a gas burner. The long process boils 40 gallons of sap down to 1 gallon of syrup. I fill a large shallow roasting pan with sap that I've strained through a sieve, lined with several layers of cheese cloth, to filter out the big pieces of debris--chunks of wood bark, dead moths, ants, etc. Turn the heat on full blast and boil at full steam, add more sap as the level goes down, skim away the foam and scum that form on the surface, continue evaporating until all collected sap is used up. When the sap in the pan turns amber with concentrated sugar and the temperature begins to rise above the boiling point of water, 212 degrees F, I move to the kitchen for better control.

    I strain the liquid , slightly thick at this point, through a dampened felt filter bag, into a large, deep stock pot and clip on a candy thermometer. This is the critical stage that can make or break the final product. The pot can boil over in an instant, going from syrup to burnt at lightning speed. I watch like a hawk. When the temperature reaches 7 degrees above the boiling point of water (219 degrees F), it is syrup. I must admit though, I don't fret too much about all this. I try to get it as close to 220 degrees as possible but, frankly, after 12 hours of boiling, I settle for less than perfect. If my syrup is too thick or too thin my family will never complain, they're lost in the pure pleasure of fresh maple syrup on their waffles and crepes.

    To can syrup for longer shelf life, pour hot syrup, at least 180 degrees F, into sterilized jars, cap and let cool in the jars, after which they can be safely stored in the pantry. Having said all that, I still store my jars in the freezer, just in case. Last year I made 9 quarts, and didn't want to risk losing them.

    Try making your own syrup at least once, you'll never complain about the cost of pure maple syrup again.

    Warm on sourdough waffles and sweet butter. Sublime!

    Maple syrup links:
    Homemade Maple Syrup
    Maple Syrup Facts
    Sugaring at Middlebrook Farm School